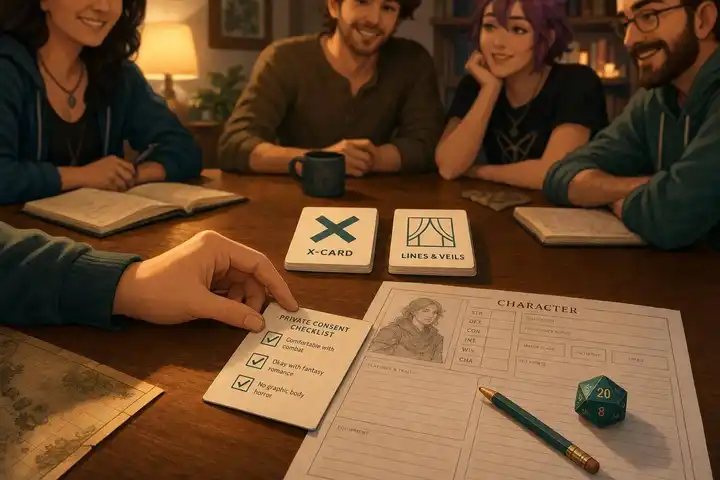
A short consent checklist makes play smoother, not stiffer. I use it to set clear lines before the first session, sort off-limits topics from handle-with-care topics, and make sure the group has a fast way to pause if something goes wrong mid-game.
Here’s the whole idea in plain English:
- Use the checklist before play starts, usually at Session Zero
- Cover the topics your game may include, like violence, romance, body horror, phobias, prejudice, mind control, and politics
- Keep answers simple, such as:
- Yes / Maybe / No
- Green / Yellow / Red
- Treat hard no’s as Lines
- Treat caution items as Veils, fade-to-black moments, or “check first” topics
- Let players answer in private
- Pair the checklist with in-play tools like the X-Card, Pause, Rewind, and Fast-Forward
- Check in between arcs or after heavy sessions, because limits can shift over time
A few facts make this easier to justify. Most checklists use 3 response levels, not long written answers. And the article points to a mixed setup - private form first, short group follow-up - as the best default for many tables because it cuts social pressure while still letting everyone align on tone.
If I want to keep the mood intact, I don’t make the checklist feel like a big event. I keep it short, use direct terms like “graphic injury” or “NPC flirting with PCs,” and remind players that they never need to explain a red answer.
| Part | What I do |
|---|---|
| Before the campaign | Send a short private checklist |
| During Session Zero | Set tone, confirm Lines and Veils |
| During play | Use X-Card or pause signals for surprises |
| After big arcs | Do a brief private check-in |
That’s the core point: clear boundaries don’t weaken intense play - they help the table stay in it.
Know what a consent checklist is before you use one
What a consent checklist covers
A consent checklist is a pregame tool that helps set boundaries around sensitive content. Once that part is clear, the next step is simple: decide which topics should go on the form.
Common items include violence, torture, body horror, phobias, romance, sexual content, coercion, mind control, prejudice, and real-life stressors tied to religion, tragedy, or culture. Some players also flag pressure-based elements, like looming deadlines or countdowns.
Simple rating systems and how they work
Most checklists use a three-level system. The two most common formats are Green/Yellow/Red and Yes/Maybe/No.
They follow the same basic idea:
- Green or Yes means you're comfortable with it
- Yellow or Maybe means proceed with caution
- Red or No means the topic is off the table
The middle option does a lot of the work here. A Yellow or Maybe rating doesn't mean, "I'm fine with this." It usually means, "check with me first" or "keep it off-screen." For example, a player may be okay with the idea that their character is being tortured, but not with a detailed, graphic description of it.
Here's how the two most common systems compare:
| Rating System | Speed | Clarity | Nuance |
|---|---|---|---|
| Green / Yellow / Red | High | High | Moderate; Yellow allows for "check-in" or "fade to black" |
| Yes / Maybe / No | High | High | Low; similar to traffic lights but often less intuitive for "veiling" |
After you pick a response scale, tailor the checklist to your campaign.
Why setting boundaries improves immersion instead of hurting it
A lot of GMs worry that a checklist will make the game feel clinical or too cautious. In practice, the opposite often happens.
Using a checklist sends a clear message: the GM is paying attention to the people at the table, not just the plot. That trust can make players more willing to engage with dark or emotionally heavy material, not less. When boundaries are clear, the GM can write stronger scenes, and players can lean in without hesitation. From there, shape the checklist around the tone of your game.
Build a checklist that fits your campaign
Adjust topics for horror, fantasy, romance, or political drama
Match the checklist to what will actually show up in the campaign. If the game leans into horror, the form should reflect that. If it’s political drama or romance-heavy, the topics should shift too.
Here’s how that can look:
| Campaign Genre | Recommended Checklist Topics |
|---|---|
| Horror | Body horror, spiders/insects, claustrophobia, cults, morbidity |
| Romance/Social | NPC flirting with PCs, emotional manipulation, "fade to black" preferences |
| Political Intrigue | Real-life political parallels, social betrayal, time-pressure mechanics |
| High-Violence Fantasy | Graphic injury, harming animals, torture, undead/demon themes |
For high-stakes games, add countdown clocks as its own checklist item.
After you match the topics to the campaign, tighten the wording. Players should be able to read each item and answer fast, without stopping to decode what it means.
Use clear wording and let players respond privately
Vague wording leads to vague answers. So instead of broad labels like “dark themes,” use direct terms such as “graphic injury,” “mind control,” “NPC flirting with PCs,” or “swarm of insects.” That kind of wording is much easier to react to on instinct.
Privacy matters too. If players fill out a form in front of the group, social pressure can shape their answers. A fillable PDF or private form shared only between the player and GM keeps sensitive replies out of a group document. That small shift can make people more honest. If you use a Yellow / Maybe option, say plainly that it means the topic is only okay after a quick conversation.
Private forms also make it simpler to revisit the checklist later without making the table feel stiff or formal.
Keep the format quick to scan and fill out
Keep the layout easy to move through. Group items by category, like Physical Health, Stress / Phobias, Social/Political, and Horror. That helps players stay oriented and finish the form without losing their place.
A simple form sent before Session Zero is usually enough. And keep it short. Only include topics that the campaign might actually use.
That way, the checklist is easier to share, easier to answer, and easier to use again later.
How to introduce the checklist without making things awkward
Bring it up at Session Zero or before the first session
Introduce the checklist before play starts. That’s the easiest moment to do it, and it feels normal there. If you’re not doing a Session Zero, send it out before the first session so players can fill it in on their own. Once the group has it, present it as a standard part of campaign prep, not a big deal.
Frame it as a tool for better play, not a formal test
Treat the checklist like a simple way to help the table communicate, not like paperwork or an exam. A clear stop point can make intense roleplay feel safer, not weaker. And when players know the group can pause if needed, they’re often more willing to lean in.
Be clear about one thing: no one has to explain or defend a Red answer.
After that, pick the response method that matches the amount of privacy your table wants.
Private forms vs. group discussion: which works better
| Approach | Summary |
|---|---|
| Private Form | High privacy, low pressure. |
| Group Discussion | Useful for shared tone, but less private. |
| Mixed Approach | Best default: form first, then follow-up. |
A private form works well for off-limits topics. Then you can follow up with a short talk about softer boundaries.
With boundaries collected, the next step is using in-play safety tools when something unexpected comes up.
Safety Tools: Pt 2 (X-Cards, Lines & Veils, RPG Consent Checklist, Luxton Method) & personal stories
Pair the checklist with other safety tools during play

RPG Safety Tools Compared: Consent Checklist, X-Card, Lines & Veils
A checklist only helps if the group uses it at the table. The point isn't to gather answers and file them away. The point is to let those answers guide play without pulling everyone out of the moment.
Turn red items into Lines and yellow items into Veils
Red items become Lines: off-limits. Yellow items become Veils: allowed to exist, but kept off-screen or faded to black.
That can look pretty simple in practice. A romance subplot may be fine as part of the story, but once it turns physical, the scene fades out. A violent confrontation may happen in the fiction, but the group doesn't dwell on graphic detail.
These tools cover content you can plan for ahead of time. Surprises are a different story.
Use the X-Card or pause signals when something unexpected comes up
No checklist catches everything. Sometimes a player doesn't know a topic will bother them until it appears in play. That's where in-the-moment tools help. The X-Card - whether it's a card on the table or a typed signal in an online game - gives anyone a way to flag content right away, with no explanation needed. The GM pauses, changes the scene, and keeps the game moving.
For smaller course corrections, use Pause, Rewind, or Fast-Forward. A Rewind changes one detail that didn't sit right. A Fast-Forward skips past the scene and moves to what comes next.
When someone uses a safety tool, the response should stay simple:
- Stop
- Acknowledge it
- Adjust the scene
- Check in
Say "Thanks for letting me know," make the change, and ask "Is everyone okay to continue?" before moving on. Don't ask why. Don't brush it off. Just shift the scene and continue.
What each safety tool is for
Each tool has its own job during the game. The checklist sets expectations up front. In-play tools deal with things that come up in the moment.
| Safety Tool | Timing | Detail Required | Level of Interruption |
|---|---|---|---|
| Consent Checklist | Before play | High - specific topics reviewed in advance | None - handled outside of active play |
| Lines and Veils | Session Zero / ongoing | Medium - defines what's excluded or faded | Low - established rules, rarely revisited mid-session |
| X-Card | During play | Low - no explanation needed | High - immediate stop or skip |
| Pause / Rewind / Fast-Forward | During play | Low - brief scene adjustment | Medium - short pause to redirect |
Once everyone knows what each tool is for, short check-ins can help keep the list up to date as the campaign shifts.
Check in on boundaries as the campaign goes on
A consent checklist should shift with the campaign. As the story changes, people’s limits can change too. So the checklist only helps if it stays up to date. The easiest fix? Do brief check-ins between arcs.
Do short check-ins between arcs or after heavy sessions
Don’t turn this into a weekly review. That gets tiring fast. Instead, check in after a big arc or after a session that hit heavier material. Let players update the checklist in private between sessions, not only at Session Zero.
"Accessibility is an ongoing practice - not a fixed achievement." - Claudia Alick, Dungeon Master and Advisor, Calling Up Justice
That line gets right to the point. This isn’t a one-and-done setup. It’s a simple habit that helps the table stay in step.
Reuse and adjust your checklist when you start a new game
When your group starts a new campaign, you don’t need to make a brand-new checklist from scratch. Off-limits items - like personal phobias or hard content limits - often stay the same from game to game, so they should carry over by default.
The part that needs a second look is the yellow section. Those items depend on context and on how much detail the campaign will use. A player may be okay with torture being mentioned in one game, but not okay with hearing a drawn-out description of it in another.
That’s why a short talk before the new campaign starts usually works better than running through the full checklist all over again. Keep the focus on the themes and tone of the new game.
Key takeaways for using a consent checklist without killing the mood
In practice, set the checklist up early. Keep it simple, private, and framed as a way to care for the people behind the characters. Then revisit it briefly, without pressure, as the story moves forward. If something unexpected shows up in play, use safety tools like the X-Card in the moment.
FAQs
What should I do if a player changes their limits mid-campaign?
Prioritize open communication and room to adjust. Handle the request with respect and without judgment.
If a player says a boundary has changed, stop the action right away, acknowledge it without asking for an explanation, and make the adjustment. Then check in with the group before moving on. Treat safety tools as living documents that you can revisit and update as player needs or campaign goals shift.
How detailed should my consent checklist be for a short one-shot?
For a one-shot, keep your consent checklist short so it fits the time you have. Stick to the main themes, possible triggers, and the boundaries that matter for that specific adventure instead of trying to cover every scenario.
Use it to set lines and veils before play starts so everyone is on the same page and you can jump into the action without a long pre-game discussion.
How can online groups use a consent checklist privately?
Online groups can keep consent checklists private with digital tools that let players share or signal boundaries without attaching their names. Some virtual tabletop extensions also let players alert the Game Master quietly, without the rest of the group seeing it.
Groups can also use private forms or secure digital channels so players can send content preferences straight to the GM. That keeps sensitive information confidential while still giving the GM what they need to support a safe, comfortable game.


